How to Build a Waterfall
You’ve worked hard to make your backyard garden pond gorgeous. Filled with water plants and goldfish, it’s the idyllic outdoor space you’ve always dreamed of. Still, something feels like it’s missing. Finally, it hits you: a waterfall! Is it possible to build your own? Yes! Follow these instructions to learn how to build a waterfall for your garden pond.
A waterfall can be constructed at the same time as a pond, or one can be added to an existing pond. In either case, the pond edge should be perfectly level and raised enough above grade so that ground water cannot run into it. It can be constructed on flat ground or into the side of a hill. In either situation, these same instructions apply.
1. Pour a Concrete Foundation
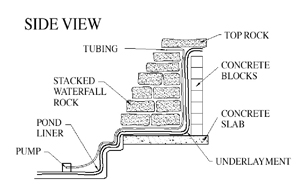
Before building your waterfall, you will need a solid foundation to support the weight of the concrete block and water fall rocks. Next to your pond, pour a concrete slab equal in size to the length and width of the waterfall you plan to build. For smaller waterfalls a large patio stone may be used. If your pond is already in place, do not pour the concrete on top of the liner at the edge of your pond. The concrete slab should be approximately 6″ thick and the surface should be level. This will help the waterfall remain level and prevent portions of it from settling unevenly. Also, the top surface of the concrete should be about 2″ higher than the pond edge which will keep the weight of the waterfall rocks off the edge of the pond.
2. Construct a Wall
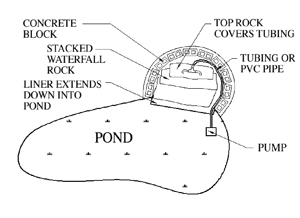
After the concrete slab has dried (approximately 24 hours), use concrete block to construct a three-sided or curved wall along the sides and back edge of the concrete slab. The height of the back of this wall should match the height of the waterfall you plan to build, and the sides step down towards the pond.
3. Add Underlayment and Rubber Pond Liner
It is important to line the whole area with 45 mil rubber pond liner to prevent any water loss from behind the waterfall. Use pond underlayment under the rubber liner to protect it from any sharp edges on the concrete slab and block wall.
How to measure for liners
To determine the size of the piece of liner needed for your waterfall, consider the height, width and depth of your planned waterfall.
Width = side to side, from outer block edge to outer block edge.
Depth = from the front of the waterfall to the back of the block wall.
Height = from the top of the foundation to the top of the block wall.
For the first measurement of the liner, add the width plus two times the height plus two feet (one-foot overlap on each side).
For the second measurement, add the height plus the depth plus two feet (one-foot overlap in the back and one foot to hang down in the pond).
Please consult an Aquatic & Garden Decor staff member to confirm your calculations before the liner is cut.
Example
Concrete block wall size: 4′ width, 2′ depth, 2′ height
1st dimension: 4′ + (2′ x 2′) + 2′ = 10′
2nd dimension: 2′ + 2′ + 2′ = 6’
Dimension of rubber liner needed: 10′ x 6′
If you are building your pond and waterfall at the same time, one larger piece of liner may be used for both.
4. Cover Foundation and Wall with Liner
Lay the underlayment and liner to cover the concrete slab and the concrete block wall. The underlayment and liner should run up the inside of the wall and over the entire top edge. The underlayment and liner should overlap the pond edge and drape down into the pond. This overlap does not need to be seamed to the pond liner because the weight of the water in the pond will hold it in place.

5. Place Pump in Pond
Place the pump in the pond and begin running the tubing that will carry water from the pump to the top of the waterfall. It is best to lay the pump on its side and raise it up a few inches off the bottom of the pond. This will keep the pump from resting in the layer of sediment that will likely form on the bottom of the pond. Ideally, you want at least 12″ of water above the intake of your pump to prevent it from taking in air, which will result in pump failure. We highly recommend placing your pump inside a mesh pump bag, which envelopes the entire pump and prevents it from becoming clogged. This will greatly reduce pump maintenance and extend the life of your pump.
6. Connect Tubing to Pump
Connect the tubing to the pump and run it up the inside of the concrete block wall, on top of the liner, to the center of the wall. Be sure you have enough tubing beyond the top of the wall to allow for final placement. The tubing size will be determined by the diameter of the discharge of the pump you choose.
7. Stack Waterfall Rock
Stack the waterfall rock on top of the liner-covered concrete slab and block wall. As you stack your rock and run your tubing, keep in mind that you want the tubing to end up lying on top of the rock that will be the second one down from the top of the waterfall.
8. Divide Tubing
Stop the tubing at the back center of this rock so that you will have room to divide the single tube to create two outlets for water flow (or more for wider waterfalls) using “T” fittings. This will spread out the flow of water across the rocks and give the waterfall a more natural look. “T”s are available in various sizes to fit the size tubing being used.
9. Conceal Tubing and Liner
Fold the liner up and over the top layer of rock. Lay your waterfall rock over the tubing and liner to conceal it. Plug in the pump and test your waterfall. After viewing your waterfall, make any adjustments you feel are needed, such as re-arranging any of the rocks to adjust the flow.
10. Add Finishing Touches
When you are satisfied with the appearance of the waterfall, it is time to add the finishing touches. Cover up all exposed areas of the top edges of the concrete block wall with additional rocks, and mound dirt up against the backside of the wall to hide the concrete block. Be sure there are no leaks. Lastly, we do suggest that when you have achieved the waterfall look you like, mortar all the rocks together for longer lasting stability.
All products and accessories discussed in this tip sheet are available at Aquatic & Garden Decor.
Find Garden Pond Supplies at Aquatic & Garden Decor
Aquatic & Garden Decor has the best selection of high-quality garden pond supplies, fountains, and water plants in the Cincinnati area. Stop by our beautiful outdoor showroom today.


